How To Set Photo In Notification Bar: A Step-by-Step Guide In the world of smartphones, personalization is key. From wallpapers to ringtones, users seek ways to make their devices truly their own. One often overlooked aspect of personalization is the notification bar android, that small strip at the top of your smartphone screen.
While this space is typically reserved for essential alerts, messages, and system icons, did you know you can also set a custom photo in the notification to bar? This direct will walk you through the steps to attain this on both Android and iOS gadgets.
Why Customize the Notification Bar?
Before delving into the “how,” let’s discuss the “why.” Customizing the notification bar with a photo can add a touch of personal flair to your device. It’s a special way to stand out from the swarm and grandstand your fashion or interface. Notification Whether you want to display a favorite photo image, an inspirational quote, or a symbol that holds meaning to you, setting a custom photo in the notification bar lets you inject a bit of your personality into your device’s interface.
Setting a Custom Photo on Android Devices
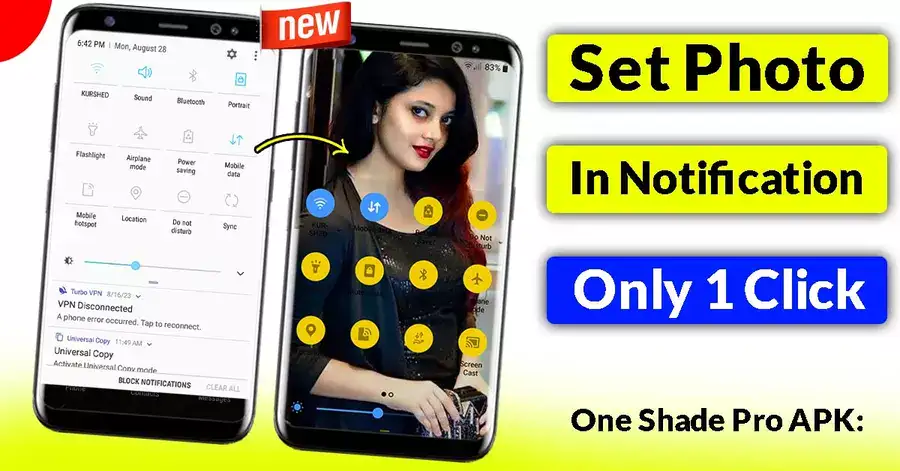
Step 1: Choosing the Right Image The first step is to select a photo image that you’d like to see in your notification bar. Be beyond any doubt that this picture will be shown in a little zone, so select something that’s basic, clear, and significant to you.
Step 2: Image Editing
Once you have the image, you might need to do some basic editing. Crop or resize the image to fit the narrow notification bar space effectively. You’ll be able to utilize built-in picture editors on your gadget or third-party apps for more progressed altering.
Step 3: Using a Custom Launcher
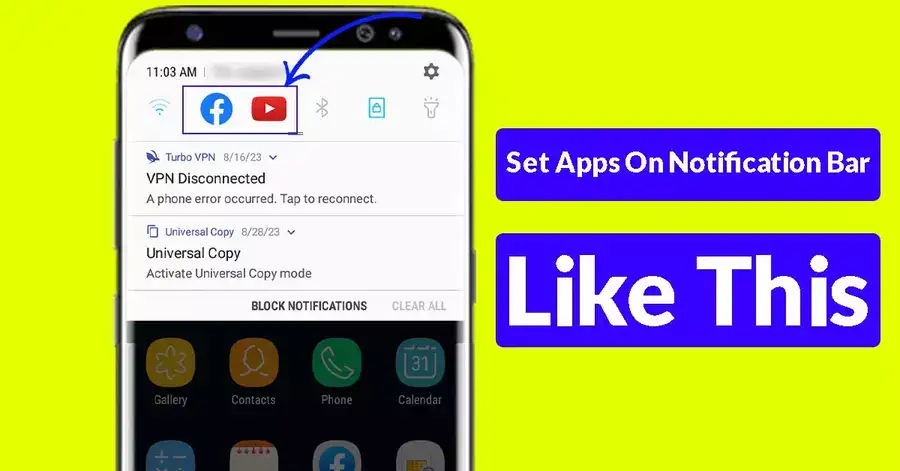
To set a custom photo in the notification bar on Android, you’ll often need to use a custom launcher app. These launchers offer more extensive customization options compared to the stock launcher provided by your device manufacturer.
- Download a Custom Launcher: Head to the Google Play Store and search for custom launchers. Popular options include Nova Launcher, Action Launcher, and Microsoft Launcher. Download and install your chosen launcher.
- Set Up the Launcher: Open the launcher app, and it’ll direct you through the setup preparation. This usually involves setting the launcher as your default home app.
- Customize Notification Bar: Depending on the launcher you choose, the customization options might vary. Look for settings related to the notification bar or status bar. You should find an option to set a custom image or icon here.
Step 4: Applying the Custom Photo
Navigate to the customization settings of the launcher and find the option to set a custom image for the notification bar. Upload the edited image you prepared in Step 2.
Step 5: Enjoy Your Customized Notification Bar
That’s it! You’ve successfully set a custom photo in your Android device’s notification bar. Enjoy the personalized touch every time you pull down the notifications.
Setting a Custom Photo on iOS Devices
Step 1: Choosing the Right Image Just like with Android, Notification the process starts with selecting an image. Opt for a picture that represents your style, interests, or something meaningful to you.
Step 2: Image Editing
iOS doesn’t offer a built-in way to customize the notification bar directly. However, you can get creative by using an image that incorporates the top part of the image as your “customized” notification bar. This way, the top part of the image will appear as if it’s a part of the notification bar.
Step 3: Setting the Wallpaper
- Open the Photos App: Open the image you want to use in the Photos app.
- Tap on the Share Button: It’s usually represented by a square with an arrow pointing out of it.
- Choose “Use as Wallpaper”: Scroll through the sharing options, and select “Use as Wallpaper.”
- Position the Image: Adjust the image so that the top part aligns with the iOS notification bar. Keep in mind that iOS might crop the sides of the image slightly to fit the screen.
- Set as Wallpaper: After positioning the image correctly, tap “Set” to choose where you want to apply the wallpaper. Select “Set Lock Screen” for this purpose.
Step 4: Creating the Illusion
Now, when you look at your device, it will appear as though your custom image is a part of the notification bar. This creative workaround gives the illusion of Notification of customization.
Conclusion
Personalizing your smartphone’s notification bar with a custom photo is a fun and inventive way to make your device uniquely yours. While the process varies between Android & iOS devices, the end result is the same: a personalized touch that sets your device apart.
To get app download link wait 1 Minute here then the download button will come:
CLICK HERE TO DOWNLOADWhether you select to utilize a custom launcher on Android or imaginatively utilize a picture as a backdrop on iOS, you will be able to appreciate your chosen image every time you associate together with your gadget. So, go ahead and give your notification bar a touch of personality!